Archive | Intermediate RSS feed for this section

Hallow-Mallows

31 Oct

It’s really too bad that you can’t give out homemade candy to trick-or-treaters without parents being wary of your sanitation practices or fearing you might have mistaken arsenic for the vanilla extract. I love to make candy, especially marshmallows. They take very few ingredients, not a ton of time, and can be flavored hundreds of different ways just by switching out the extract or adding spices or crushed candy to the final dredge. This Halloween version has a sweet vanilla-bean middle with a crunchy chocolate topping, better than any bag of long-ago packaged candy. Mmm.

Chocolate-dipped Marshmallows

Ingredients
3 envelopes of unflavored gelatin
1/2 cup cold water

2 cups sugar
2/3 cup light corn syrup
1/4 cup water
1/4 teaspoon salt
1/2 of a vanilla bean, split and scraped or 1 tsp. vanilla extract
Orange food coloring

6 oz. semi-sweet chocolate chips

1/2 cup cornstarch mixed with 1 cup of powdered sugar.

Method
Grease a 9×13 in. pan and cover it with a layer of the cornstarch/powdered sugar mixture. (Reserve the rest for dredging the marshmallows later.)

In the bowl of an electric mixer fitted with a whisk attachment, combine the gelatin and 1/2 cup cold water. Let bloom for 10 minutes while preparing the sugar syrup.

In a large saucepan over medium-high heat, combine the sugar, corn syrup, 1/4 cup water, salt, and vanilla. Stir gently to dissolve the sugar and then let the mixture come to a boil. Boil for 1 minute and then remove from the stove. Allow the bubbles to dissipate.

Turn the mixer onto its lowest setting and slowly add the sugar syrup to the gelatin. When all of the syrup has been added, turn the mixer to the highest setting and whip for 12 minutes. When there are about 2 minutes left, begin adding food coloring until the desired shade of orange is reached.

After whipping for 12 minutes, you should have a fluffy, shiny, creamy marshmallow mixture. Using a greased spatula to get as much as you can (you will not get it all, trust me) pour the mixture into the 9×13 in. pan. Then, quickly grease your hands  and use them to spread the marshmallow into an even layer. Sprinkle another layer of the cornstarch/powdered sugar mixture on top. Let set for about an hour in the pan. When you can press a finger on top of the marshmallows and they spring back, they are ready to remove from the pan.

Flip the rectangle of marshmallow onto a cutting board and cut into squares using a pizza wheel. Toss the squares in the remaining cornstarch and powdered sugar to keep them from sticking together. Store in an airtight container.

Melt the semi-sweet chocolate chips over very low heat and mix the melted chocolate until it is smooth and shiny. Dip one side of the marshmallow into the chocolate, swirling gently to coat evenly and then place on a cooling rack to dry. Makes about 90 marshmallows.

Happy Halloween!
Ciao for now,

Neen

Mystery Food Week 20: Grand Finale edition

14 Oct

Well here it is, the final week of Mystery Food 2010. The season seems to have come and gone in the blink of an eye this year. Here’s week 20:

Butternut squash, sweet potatoes, green beans, apples, and beets. How wonderfully autumn!

I still have last week’s pumpkin and an array of squash, so there will undoubtedly be a lot of canning this weekend. I got around to taking care of some of the apples over the weekend after finishing the first round of Project Boerewors. (First round because the boss gave me some ideas for improvement and delicious culinary projects take time and refinement.)

But yes, about those apples. I had planned to can pie filling because Rome apples stand up incredibly well in baking applications, but alas I forgot to order some Clear-Jel before the weekend. I’ve never found a store that sells it and usually buy a bag online just as fall starts specifically for the purpose of making pie filling. Clear-Jel is cornstarch that has been modified to withstand the high temperatures that it is exposed to during the canning process without becoming cloudy or losing its thickening ability. So, no pie filling…yet.

So I did what any resourceful food preservation lover might and turned to my trusty Ball Complete Book of Home Preserving and looked in the index under “apples.” An overwhelming number of recipes poured off of the page, but I was looking for something a bit simple. (I’ll tell you why later.) One recipe caught my eye and with only 4 essential ingredients it was a perfect project for the day:

Brandied Apple Rings

Ingredients
5 lbs. apples, cored and cut into ¼ inch rings, treated with lemon juice or citric acid to prevent browning.
3 cups water
4 cups sugar
1 cup brandy
Red food coloring (optional, but makes this look oh-so-pretty.)

Method
-Bring sugar and water to a boil in a saucepan large enough to fit all of the apples. Boil sugar and water for 5 minutes.
-Remove from the heat and add the apples and food coloring. A few drops of food coloring is all you need. Let the mixture boil gently for 15 minutes or until the apples are tender.
-Again remove the pan from the heat and remove the apples from the syrup using a slotted spoon.
-Pack the apples loosely into clean, warm jars, leaving ½ inch headspace.
-Put the saucepan back on the heat and return the syrup to a boil for one minute. Remove from the heat and stir in the brandy.
-Pour hot syrup over apples, leaving ¼ inch headspace. Tap the sides of the jars to remove air bubbles and then adjust the headspace if necessary.
-Wipe the rims of the jars clean and then place on the lids and screw on rings.
-Process jars in a boiling water bath for 15 minutes.

The apples are tasty warm, but I bet they are even better after sitting in that brandy-syrup for awhile. They are a lovely accompaniment to fall pork dishes and would also make a slightly more elegant strudel.

By the way, if you have syrup left over after filling the jars, put it back on the stove over medium heat and let it reduce to a thicker consistency. Add a few shakes of cinnamon and you’ll have a delicious topping for ice cream, waffles, cheesecake, or a spoon!

So, why did I go for a simple apple recipe over a more ingredient-heavy chutney, salsa, or multi-fruit jelly? I guess you’ll have to wait until I post about Project Ice Cream Layer Cake later this week… 😉

Ciao for now,

Neen

Mystery Food Week 19: Clown Box edition

6 Oct

My stomach and I are at war. I don’t know what I ever did to it, but it’s mad at me. Most of my delicious mystery food from last week had to go the preservation route, but I am absolutely not complaining about a freezer full of lunches. I did get around to making some delicious potato soup from the mountain of potatoes I accumulated and it’s been a lifesaver while I’m not feeling 100%. It’s also perfect for this lovely, brisk weather that has appeared out of nowhere. It’s not too heavy, but substantial enough for a meal:

Crock Pot Potato Soup

Ingredients
-12 small/medium potatoes (use the week 17 and 18 pictures for size reference.) They yielded about 6 cups diced.
-1 medium white or yellow onion, diced.
-3.5 cups of low sodium chicken stock. I like Kitchen Basics’ unsalted variety.
-3 cloves of garlic, minced.
-3 slices of bacon
-1 cup of 2% milk
-1.5 tsp. dried thyme
-A few shakes of cayenne pepper
-Salt and pepper to taste
-Green onions or chives to garnish

Method
-Peel and quarter-inch dice your potatoes. If you too are sick with the stomach flu, have a friend drag a chair and your laptop into the kitchen so that you can sit and watch bad reality television like Hell’s Kitchen while you work. If you’re preparing them in advance, put the diced potatoes in a bowl and cover with cold water. This will keep them from turning gray.
-Dice the bacon and sauté it to render out most of the fat.
-Put the potatoes, chicken stock, bacon, thyme, pepper, and some salt into the crock pot and set it on high.
-Gently sauté the onions in the left over bacon fat (you may need to add a splash of olive oil) until translucent and fragrant. Add the garlic and sauté 1-2 minutes more. Add this to the crock pot and give everything a quick stir.
-Cook on high for 4 hours.
-Ladle half of the soup into a blender and add the milk. Blend until smooth. Add the puree back to the crock pot and cook for another ½ hour on low. (It should be simmering very gently.)
-Garnish with green onions and a few grinds of black pepper. Eat merrily.

Yield: Six 1 ½ cup servings

It’s so good. I confess, however, that by the end of the weekend I was really tired of the lack of solid food in my diet. I made cookies and justified it by saying that the inclusion of ginger (digestive aid!) and blackstrap molasses (iron!) made them an appropriate snack. And they’re perfect autumn cookies, best eaten alongside a strong cup of coffee.

Giant Gingersnap Cookies

 Ingredients
-1 cup all-purpose flour
-2/3 cup sugar
-4 tbsp. unsalted butter
-1 egg
-2 tbsp. blackstrap molasses
-2 tsp. cinnamon
-1 tsp. ground ginger
-1/4 tsp. ground allspice
-1/4 tsp. baking soda
-1/4 tsp. salt
-A few grinds of black pepper (really amps up the spices)

Method
-Pre heat an oven to 350 degrees F.
-Mix the flour, cinnamon, ginger, allspice, baking soda, salt, and pepper in a bowl and set aside.
-Cream the butter and ½ cup of the sugar (reserve the rest in a small bowl) until fluffy. Add the egg and molasses and mix well.
-Slowly add the dry ingredients to the wet and mix until just combined.
-Line two baking sheets with parchment paper and drop the dough by rounded tablespoonfuls onto the baking sheets. They will spread slightly, so only put 7 cookies on each sheet.
-Spray the bottom of a glass with non-stick cooking spray, dip in the bowl of reserved sugar and then flatten a mound of dough. Repeat for each cookie.
-Bake for approximately 13 minutes or until just set. The centers will still be slightly soft, but will firm up and be crunchy once cooled.
-Cool on a wire rack and then store in a sealed container for up to a week. But they won’t last that long.

Yield: 14 big wonderful cookies

Onto this week’s Mystery Food…I called this week the clown box edition for good reason. Items just kept coming out no matter how many times I reached into the box! Fantastic.

Salad greens, Rome apples, green bell peppers, a small eggplant, squash, potatoes, and a lovely pumpkin. I found a recipe for sweet spiced pumpkin pickles so I might give that a go. If I end up canning I might also use some of those beautiful Rome apples to make apple pie filling. A quart jar of pie filling is the perfect amount for a 9-inch pie.

I hope you enjoy this week’s recipes. I’m crossing my fingers that my stomach and I can form a peace treaty so that there will be apple-picking in the near future. What better way to celebrate autumn?

Ciao for now,

Neen

Mystery Food Week 9: Heatwave edition

29 Jul

Another very fruit-filled box this week!

Here we have a tomato, melon, doughnut peaches, freestone peaches, green beans, and summer squash. I made a great little dish out of the tomato, green beans and squash sauteed with hot peppers, garlic, and onions. Topped a bowl of it with a slice of provolone and let it melt. One of the best vegetarian meals I’ve had in awhile. Nice and simple too for these dog days of summer.

It hit triple digits here over the weekend and of course our air conditioning decided to die. Fortunately, it was after I finished baking an assortment of 6 dozen cookies for co-workers (mine and Joe’s) because, well, who doesn’t like homemade baked good surprises? Here’s the sampler plate…I had leftover chocolate ganache in a ziploc bag and decided to do a little art project.

One knows that it must be unbearably hot outside when, aside from a lone box of Italian ice, the grocery store is entirely sold out of popsicles and sorbet. Thus was my experience on Tuesday evening. There was still an array of ice cream on the shelf, but I wasn’t really in the mood. I wanted something refreshing, cool, and fruity.Well, if you want something done you’ve got to do it yourself sometimes. I’m seriously disappointed that I couldn’t get a good picture of the final dish, because it was absolutely out of this world.

Peach-Basil Sorbet (with vanilla whipped cream and double-berry preserves)

Players
for the sorbet:
-5 to 6 ripe medium sized peaches, diced. (You can peel them if you want…I never do.)
-Handful of basil leaves, torn.
-1 tbsp. lemon juice
-3 tbsp. sucanat or sugar
-1/2 cup water
-Pinch of salt

for the cream:
-Whipping cream
-Sugar, to taste (I used about a tbsp.)
-1 tsp. vanilla extract

for the topping:
 -Blackberry/blueberry preserves

Method
Combine the sugar, water, salt, and lemon juice in a small saucepan and slowly bring to a boil.
-Add the basil leaves and boil for 10 minutes or until slightly syrupy.
-Combine the peaches and basil syrup in a blender and process until smooth.
-Churn in an electric ice cream maker for about 20 minutes and then transfer to a freezer safe container and chill.
-Whip the cream, vanilla, and sugar until soft peaks are formed.
-To serve, place a scoop of the sorbet on a plate, top with a spoonful of preserves and a spoonful of the whipped cream. Garnish with more torn basil if desired.

It is a really wonderful summer dessert with all of those components, but that’s only if you can keep yourself from eating the sorbet straight out of the freezer. It’s a challenge.

Enjoy the week and stay cool!

Ciao for now,
-Neen

Mystery Food Week 3 and Doing the Can-Can

17 Jun

I took advantage of waking up incredibly early this past Saturday and decided to take a trip out to Bluemont, VA and visit Great Country Farms. That’s where I’ve purchased a CSA share from this year and their weekly newsletter noted that tart cherries were ripe for picking.

It took about an hour to drive to the farm from Arlington, but it was a peaceful, sunny morning and I spent the next hour or so in cherry trees looking for the chubbiest, dark red specimens. Well, 6lbs. of cherries later I finally decided that I had enough for jam and drying. The trees were so lovely and the landscape was incredibly serene. It was nice to be somewhere so quiet.

Sunday morning I at last christened the new canning rig…Now this is canning Tim Taylor/Jeremy Clarkson (“POWERRRRRRRR!”) style:

I whipped up a batch of fabulous tart cherry jam. No-sugar-added jam is actually quite easy to make. The canning process adds a few extra steps at the end, but the actual method for jam-making is very straightforward.

 I used 3lbs. of cherries, 1 1/4 cup of white grape juice, one box of no-sugar/low-sugar pectin, and a 1/2 tsp. of citric acid to preserve the vibrant red color. To get started, pit the cherries and put them in a big pot on the stove over high heat. Smash them up with a potato masher, sprinkle in the citric acid (you can also use a squirt of fresh lemon juice) and let it come to a simmer. Whisk the grape juice and pectin together and then add them to the cherries. Let the mixture come to a full, rolling boil (one that does not stop when stirred) and cook for 1 minute. Turn off the heat and skim the foam off of the top of the jam. Let it sit for 5 minutes and then stir before ladling into jars. This short rest period followed by stirring keeps the fruit from floating to the top and separating from the juices. Even though it’s very liquid-y when hot, the jam will set as it cools down.

If you’re interested in canning this recipe for long-term storage or gift-giving you will also need a big pot of boiling water, 5 or 6 pint jars with flat lids and rings, and something to lift the jars in and out of the boiling water. Jar grabbers are available online for less than $10. If you have mason jars hanging around, the actual jars and rings are certainly reusable, but it is important to always use brand-new flat lids as the adhesive on them will only form a tight seal once.

Sterilize the jars and rings by washing them with hot soapy water or running them through a dishwasher with a heated dry cycle. While you prepare the jam, place the flat lids into a small pan of simmering water to warm up the adhesive. Gently ladle the hot jam into the jars, leaving 1/4 inch headspace at the top. Wipe the edges of the jars with a damp towel, place on the flat lids, and then screw on the rings. Place the closed jars into the pot of boiling water, making sure that they are completely submerged, and boil for 10 minutes. Carefully remove the hot jars and place them somewhere to cool undisturbed. Over the next several hours, you might hear tiny popping noises–it’s a good thing. It means that the air-tight vacuum has formed and that the jar has properly sealed. After 24 hours, check all of the jars by pressing down on the flat lid gently. If it doesn’t pop back, the jar is safely sealed. Store the jars in a cool, dark place for up to a year. Homemade jam will start to lose its firm set after about 8 months, but is still safe to eat (albeit a bit runny) as long as the jar remains sealed.

Here’s the final product, from farm to table in one weekend:

Not a bad way to spend the weekend, I must say. And of course, a mere two days later it was time for more goodies:

That’s Mystery Food Week 3 and included in the basket this week were collard greens, red leaf lettuce, beets, broccoli (my personal favorite), and cilantro. Cilantro and I don’t get along so well, so that plant will probably be given to a good home. I’m sorry cilantro, it’s not you, it’s me.

I’m still thinking up creative ways to use everything, but those collards look destined for my favorite application—sautéed in a bit of bacon fat with a whole lot of garlic and white beans. Food just doesn’t get more comforting than that.  Have a great week all!

Ciao for now!
-Neen

A Delightful Trio of Bread

26 Jan

I am constantly amazed at the variety of ways people respond to stress. Joe goes for video games. I see the appeal in that—particularly because he likes the role-playing games where the story changes based on the decisions your character makes. There’s a certain amount of control, and yet a freedom in the whole escape aspect of it. I have other friends that smoke, and some that simply insist that there’s no better way to unwind than a glass of red wine or a cocktail. Still others would chime in that the best way to relieve stress is a good, hard run.

I don’t see any of these responses in the light of “good” or “bad.” More and more I think that we need to be lenient with ourselves. Technology has allowed communication (and thus, work life) to speed up so much that I think people take what they can get to find some relief from the constant barrage of work communication. No, smoking isn’t really a great habit. Nor is drinking to excess. And if you played video games or exercised 24-7 that would be a problem too. But I think that every person needs an outlet. To say that choosing to do yoga over watching a movie is “better” because of its benefits to the mind and body is oversimplifying, in my opinion. There are days when I need yoga.

But there are also days where I need…to knead. Like I said, some folks go dancing to unwind…

I bake bread.

What is it about bread in particular? I don’t know. I’ve always loved bread. As a kid, my family teased me about being the carbo-queen. At family dinners, I’d gladly opt out of dessert in favor of another slice of fresh, warm bread.

And so maybe it is those memories of childhood… the thought of dad’s Easter bread peeking out of the oven, golden-yellow and perfect from being baked at just the right temperature after receiving a careful egg-wash… the thick slices of soft Italian bread covered in butter I used to get at Primanti’s before I was old enough to enjoy the sandwiches… the perfect toast at Jo Jo’s that sopped up the rich yolks from fried eggs on Sundays after church…

When I’m stressed out, sad, or just wanting to feel better, there is nothing so soothing as making bread. The very idea of creating the food that is the very symbol of a “staple” and sharing it with others always makes me feel warm and fuzzy inside.

Focaccia (Roman Flatbread)


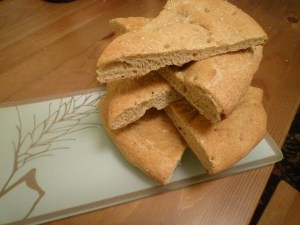
The first yeast bread I ever made was focaccia. It seemed logical to start out with something that wasn’t entirely dependent on rising or shaping…but I fell in love. A basic olive oil flatbread became heaven on a plate with a sprinkle of coarse salt or the addition of some chopped rosemary. This also makes a great pizza base. In fact, I was making a batch of this last week when Joe came home from work exhausted and prepared to order a pizza. The dough was already in the middle of rising. “No need,” I told him, “I’ll make you one.” He looked at me like I was a little bit crazy, but 25 minutes later he was eating homemade pizza.

Ingredients

18 oz. flour (I use half white and half whole wheat)
12 oz. warm water
1 tbsp. active dry yeast
1 tbsp. sugar
1.5 tsp. salt
1 tsp. olive oil

Method

Combine water, sugar and yeast and let stand until foamy (about 5 minutes). Add the flour, oil, and salt and mix well. Turn out onto a floured surface and knead until smooth.

Let the dough rise in an oiled, covered bowl until it has doubled. Punch it down, and then stretch and press it out onto an oiled sheet pan. I generally make two round loaves (about the size of a medium pizza) with this recipe. Let rise again for 15 minutes.

Brush with olive oil and a bit of coarse salt or herbs and bake at 400 degrees F for 20 minutes.

Yield 16 slices.

Perfect Bread Knots


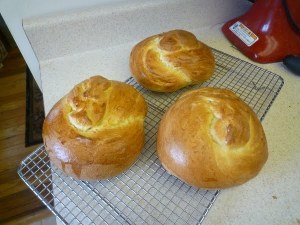
I can take no credit for this recipe. In fact, after years of stealing leftover bread knots after holidays at my parents’ house, I only recently (think: December) got around to asking my dad for the recipe. It makes 24-2.2 oz. knots, but as you can see in the picture, it works for larger shapes as well. I made three small loaves this last time around. It makes a perfect sandwich bread, but I think it’s best when it’s warm or toasted.

Ingredients

1 tbsp. active dry yeast
1.5 cup warm water
1/3 cup vegetable oil
1/4 cup sugar
6-7 cups flour
1 egg
2 tsp. salt

Method

Combine water, sugar and yeast and let stand until foamy (about 5-10 minutes). Add the oil, egg, and salt and mix well. Then add the flour, one cup at a time until a cohesive dough forms. Turn out onto a floured surface and knead until smooth. Roll into a ball and place in an oiled bowl. Cover the bowl with a tea towel or plastic wrap.

Let the dough rise at room temperature for an hour, then punch down and let rise again for a half hour. Alternatively, you can just let it rise in the fridge overnight. I think that works best, honestly.

Shape the dough into loaves or knots and then let them rise for another 15-30 minutes. Brush lightly with an egg wash (1 egg mixed with 1 tbsp. water). Bake at 375 degrees for 15-20 minutes for small knots or about 30 minutes for larger loaves. The bread is done when it is golden brown or sounds hollow when the bottom of the loaf is tapped with a finger.

Yield: 24 dinner-sized rolls

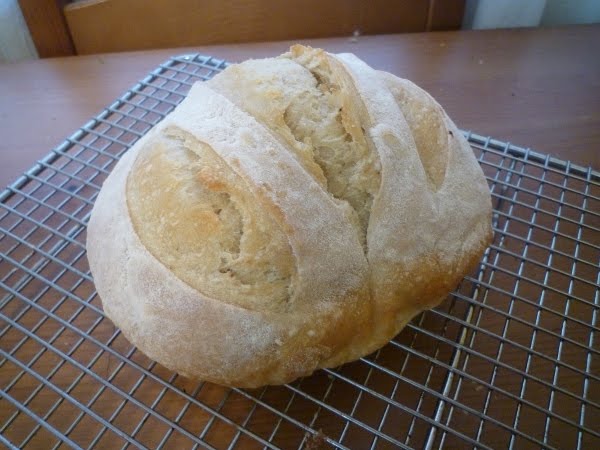
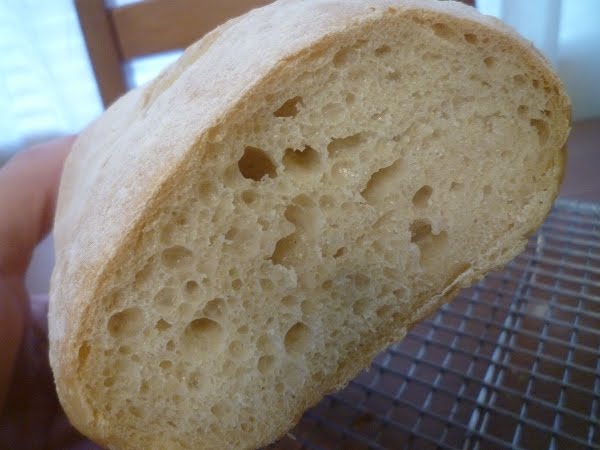
No Knead Artisan Bread


This is the easiest bread I’ve ever baked, and frankly tastes like it’s straight from a bakery. The minute I pulled the first crusty loaf out of the oven I knew that this would become my “go-to” bread recipe. The ingredients and method can be found here.

Note: I don’t have a stone or a pizza peel and this still comes out fantastic. After shaping the loaf, I simply put it on a piece of parchment paper and put a baking sheet in the oven while it is pre-heating. When the bread is ready to go in the oven, I just take it on the parchment and set it on the pre-heated baking sheet. It’s not exactly the same, but it does produce a slightly crispier crust.

If you’re someone who has always wanted to bake bread, but feels intimidated, it’s a great recipe to try. I find that the loaves are more flavorful after the dough has been sitting in the fridge for a few days, so don’t worry about using it all at once. For a few minutes of your time before or after work, you can have fresh-baked bread that is worlds better than anything you can find at the grocery store. Trust me.

When I finished baking these various breads, I felt good. But let me tell you the best part of it all:

I got to feel good again when Joe smiled as he sunk his teeth into a 3rd slice of the focaccia pizza…
And again when Amanda’s eyes lit up upon seeing the bread-knot loaf I made for her…
And again when I passed one of my artisan loaves along to Roger during a week where he had little time or energy to cook…

Bread-baking is the gift that keeps on giving. So bake some bread, and pass it on. You’ll be glad you did.

Cheers,
Neen