Archive | Intermediate RSS feed for this section

Hot Dates (with chocolate, football and mystery food)!

25 Aug

Wow–I have way too many things to update, so long post ahoy:

Numero uno, friends, is Mystery Food Week 11. It was a delicious mix of sweet corn, tomatoes (Mr. Stripey!!!), Thai basil, Italian basil, eggplant, purple potatoes, garlic, hot peppers, nectarines, peaches, and apples. So much food! And I only buy a half-share.
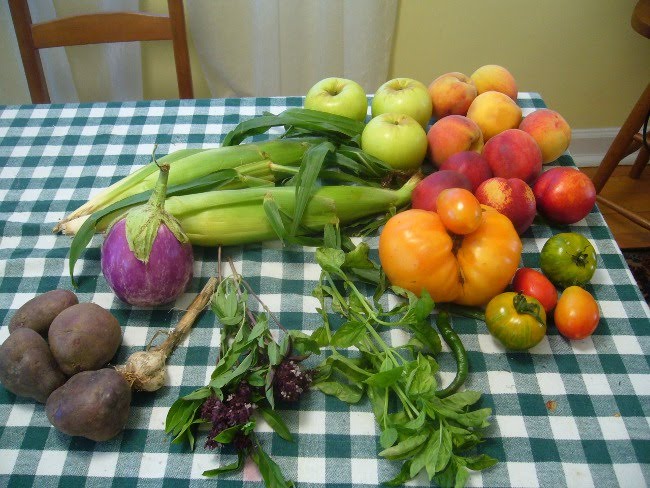
Of course the first thing I did when I got home from picking this up was to make a big batch of tomato sauce for pasta. I love a long-cooked tomato sauce, but there’s something so sweet, simple, and wonderful about a quick summer sauce. The squash, potatoes and peppers ended up in a pot roast I made from a chuck blade roast from Polyface farms. I seasoned and seared the meat, caramelized some onions, and then threw everything into the crockpot with a splash of red wine to cook all day. When I came home, Dioji was very anxious to discover where the delicious smell that he couldn’t find was coming from (he’s not allowed in the kitchen while we’re not home–safety first!) and then whined at me when he realized it wasn’t for him. Oh sheltie.

Numero dos is that our fantasy draft for the “I Cannot Wait For Football” league was this past weekend. It went pretty well for me, although I made one really bad decision because of outdated information. Here’s the lineup for team Plaxico’s Cellmate:

QBs: Drew Brees, Jay Cutler, Chad Pennington

RBs: Clinton Portis, Steve Slaton, Joseph Addai

WRs: Chad Ochocinco, T.J. Houshmanzadeh, Steve Breaston, Michael Crabtree

TEs: Dallas Clark, Owen Daniels

K: Ryan Longwell

DEF: Pittsburgh, Philadelphia

A pretty solid draft if I don’t say so myself. The Michael Crabtree thing was a lapse in judgment, I swear. We have another one this weekend, but I’ll be autodrafting because it is the same day as my brother’s wedding. I’m not sure he’d be too pleased with me if I disappeared from the reception to draft a fantasy team.

And Numero Tres is that I’ve been craving filled pastry/cookies. I used to really like fig newtons heated up in the toaster oven when I was a kid. A week or so ago, I was in the market and saw some nice, soft Medjool dates. I remembered from when I was first diagnosed with anemia that dates were a good source of iron, but I’ve never cooked with them before last week. Recalling that the texture of my favorite kashi bar (the dark chocolate/coconut one) is made by creating a date paste, I decided to try a similar route. After several tries using the food processor to create said paste, I got frustrated because it never seemed to get sticky enough to hold everything together. The raw date bar recipes I searched all suggested that the approach would work, but it wasn’t the consistency I wanted. Finally, I found a good old southern recipe for date squares and modified it using a base recipe similar to my Banapple-Nut Bars.

I’m not saying I’m a genius, but this is kind of amazing…

Chocolate-Date Cookie Bars

Ingredients

For the cookie base:
1/2 cup rolled oats
1/2 cup mixed nuts, ground to a coarse meal by pulsing in a food processor. (I used a mix of macadamia, cashew, almond, and brazil nuts.)
1/4 cup 10-grain hot cereal or other high-protein hot cereal, dry.
1/2 tsp. cinnamon
1/4 tsp. baking soda
Pinch salt
2 tbsp. raw honey (I really like buckwheat honey in this, but anything will work.)
1 medium egg
2 tbsp. natural peanut butter
For the filling:
1/2 cup Medjool dates, pitted and chopped
1/2 cup water
1/2 tsp. vanilla extract
1/4 tsp. almond extract
1 heaping tbsp. dutch process cocoa powder
10 grams 70% dark chocolate, chopped.
For the topping:
1 tbsp. shredded, unsweetened coconut
1/2 oz. mixed nuts, roughly chopped. (If you would like the recipe to be lower-fat, you can skip this and use some lightly toasted seeds, rolled oats, or cereal.)

Method

Preheat an oven to 350 degrees F.

In a small saucepan, combine the dates, extracts, and water over medium heat. Bring to a simmer, stirring occasionally until thickened. Use a potato masher or immersion blender to create a more even consistency. Stir in the cocoa and dark chocolate and set the mixture aside to cool.

In the bowl of a food processor, combine the oats, ground nuts, cereal, cinnamon, baking soda, and salt. Slowly drizzle in the honey while pulsing occasionally to disperse evenly.

In a small bowl, whisk together the egg and peanut butter, then add them to the food processor while pulsing occasionally until a sticky dough is formed.

Grease a 9×5 loaf pan and press the cookie dough into the bottom to create an even crust. Next, layer on the chocolate-date paste, and then top with the chopped nuts and shredded unsweetened coconut.

Bake for 20 minutes and cool completely before cutting into bars.

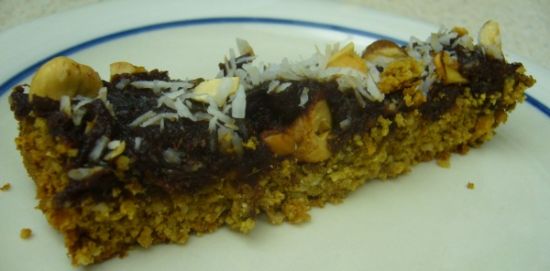
So good. Not a drop of refined sugar or flour and yet somehow full of sweet, chocolatey, nutty goodness.

Nutrition facts: Yields ten servings. Each cookie bar is approximately 138 calories, 7 grams of fat, 4.5 grams of protein, and 16 grams of carbohydrates. They are also a good source of vitamin A, vitamin B-6, folate, and iron.

I think that this recipe could be easily modified into a good energy bar recipe by adding another egg white, replacing some of the oats with some wheat bran, and maybe adding some greek yogurt into the filling or base. If you were so inclined, you could replace the 10 grain cereal with a scoop of vanilla or unflavored protein powder. I’m really trying to keep things more natural these days.

Oh, and if you want to blow your mind…mix a spoonful of the chocolate-date paste and some berries into 5 or 6 oz. of nonfat greek yogurt for a creamy treat. That’s a post-run snack I can totally get behind.

Well, I’m off to Pittsburgh tomorrow for my brother’s wedding, so I’ll be M.I.A for a little while. In advance, have a great weekend and good luck to all my fellow fantasy team owners who have upcoming drafts.

Stay local, folks!

-Neen

Clean BBQ? It’s True…

28 May

When Joe and I decided to have folks over for Memorial Day this year, I decided that I wasn’t going to prepare a bunch of food that I couldn’t eat. For one thing, I knew that there would be leftovers and I wasn’t tossing away my grocery money on food that wasn’t in my plan. Furthermore, I thought my guests deserved food and not “food-like products.”

Here I am hanging out with Mr. Stripey ready to grill, so what was on the (mostly) clean menu?

Clean Eating Magazine’s Caramelized Onion, Spinach, and Artichoke Dip served with Trader Joe’s natural corn tortilla chips, chopped carrots, toasted whole grain bread, and sugar snap peas (from Westmoreland Berry Farm—so delicious!).

Dry rubbed chicken legs grilled to perfection and then glazed with a natural BBQ sauce.

Grilled portabella mushrooms, green peppers, and tomatoes tossed with olive oil, red wine vinegar, kosher salt, lemon-thyme, pepper, and garlic.

Not pictured: Dry rubbed smoked spare ribs that I had hanging out in our freezer for awhile. I was saving them for a special occasion. I warmed them over low heat in the crock pot for a few hours with a bit of cider vinegar and sucanat in the bottom. It made its own sauce and tasted absolutely fantastic!

Chocolate sour cream cupcakes, modified from Clean Eating’s recipe. I replaced the skim milk with unsweetened chocolate almond milk the second time I made these and never looked back. Best chocolate dessert ever.

I also made classic and in no way clean vanilla ice cream using the base for Cliff’s ice cream recipe from the Top Chef cookbook. It was some really great stuff. I used heavy cream and milk that was practically fresh from the dairy and the rest of the eggs that I gathered from the farm. Joe is still savoring the final container of it.

Sunday evening I realized that my berries from Westmoreland were on the verge of over ripening. Not wanting to let them go to waste and having cold/sweet stuff on the brain, I made some frozen yogurt. That vanilla ice cream might be decadent, but this stuff is sweet, tangy, cool, and 94 calories a serving.

Fresh Strawberry Frozen Yogurt

2 cups good quality low-fat plain yogurt (I buy mine from Blue Ridge Dairy Co.)

1 cup pureed fresh strawberries

1/3 cup raw, natural honey

Pinch salt

Combine all ingredients in a blender and then chill in a lidded container in the refrigerator for at least 2 hours. This really improves the texture and flavor quality of the final product, so don’t skip the rest period!

Churn for approximately 25 minutes in a countertop electric ice cream maker and then transfer to a lidded container and freeze for at least 3 hours before serving. On his show Good Eats, Alton Brown often says, “Your patience will be rewarded.” Listen to these wise words.

(Makes 6 servings)

I really would have taken a picture of it’s awesome pink color, but it didn’t last long enough! I guess I’ll just have to make it again soon…

Stay local!

-Neen

Inspiration at the Farmer’s Market

11 May

I think that I must have been a farmer in another life.

There’s nothing that gets me more motivated to eat well and eat clean than to buy groceries fresh from their sources. I have accepted that this means putting a few extra dollars aside every week, but it is a.) incredibly important to support local farms that focus on sustainable agriculture and b.) much better for all who eat my cooking to not be unwillingly inundated with extra hormones/salt solutions…etc.

It was with that motivation that I set out for a Saturday morning trip to the Arlington Farmer’s Market. For many folks, the image of these street markets conjures up thoughts of craft stands with the occasional person selling homemade preserves or fresh herbs. Arlington’s market, however, is a clean eater’s paradise. There’s a vendor for nearly any grocery item you might need including (but not limited to) a baker that sells whole-grain products (some gluten-free items), several dairy farmers featuring fresh eggs, milk, and cheese, veggie/fruit farmers with produce of all kinds, tomato and herb plants, livestock farmers selling meat and poultry, a mushroom vendor with a wide variety of types, and even someone selling raw honey. The Master Gardener’s club also has a tent on-site to answer any gardening questions people purchasing plants might have.

This week’s trip yielded a whole chicken, some buffalo burgers and jerky, pork chops, vine tomatoes, homemade ricotta (which is so good that eating it out of the container with a spoon is perfectly acceptable) and mozzarella cheeses, a dozen eggs, two giant portobello mushrooms, baby arugula, romaine lettuce and a sweet onion.

Many of the farms are located in Loudon County, which is having their spring farm tour this coming weekend. I’ve already decided that I want to visit one of the places where you can gather your own eggs, but it’s also getting close to the time of year when strawberries are candy-like, so…decisions, decisions!

Anyway, my motivating trip to the market segued nicely into cooking. Looking to use up some of the grains I had around, I decided that pizza dough was in order…

Ingredients

2 1/4 cups whole grain spelt flour
1/2 cup whole wheat pastry flour
1/4 cup whole grain durum flour (Usually labeled as semolina, has the consistency of fine cornmeal)
1/2 tbsp. light olive oil or grapeseed oil
1/2 tsp. kosher salt
2 1/2 tsp. dry active yeast
1 cup warm water (105-110 degrees F)
1 tsp. sucanat or evaporated palm sugar

The method is the same as you’d do for any normal yeast based pizza dough…

*Dissolve the sucanat in the warm water and sprinkle the yeast on top. Allow this to sit for 5 minutes or until the yeast foams.

*In a separate bowl, combine the flours and salt. Make a well in the center and gently pour in the yeast/sucanat/water mixture.

*Add the olive oil.

*Mix until a soft dough forms and then turn out onto a board lightly dusted whole wheat pastry flour. Knead 10-15 minutes or until smooth and elastic.

*Roll the dough into a ball and put it in a bowl that has been greased lightly with olive oil. Toss to coat the dough with the oil and then cover with a towel and allow it to rise for one hour.

*Preheat the oven to 425 degrees F.

*Punch the dough down and allow it to rise for another half-hour.

*Now, you’re ready to bake! Stretch the dough out on a cookie sheet or pizza stone, top with your favorites, and bake for 15 minutes. (I made some homemade sauce out of those vine tomatoes and topped with the fresh mozzarella and a few dollops of ricotta)

NOTE: I did a slow-rise with this the first time I made it (24 hours in the fridge as opposed to 1 hour in a warm place), but it came out a touch tough. I prefer a crust that is crisp on the outside, but has a little softness to the bite.

A common complaint from people who try this and other whole-grain based breads/crusts is that it’s heavy. Yes, it’s true. I ate one piece of this pizza and was full for the rest of the afternoon. (Joe had two pieces and was full to give you an idea of how the average stomach reacts.)

You’re absolutely going to feel full. Eating whole grains means that you’ve got to digest every part of the grain including the germ, bran, and kernel. It takes a lot of time and effort for the body to do that. When you eat refined flour, a lot of those elements get taken away, thus it takes more to fill you up. This is, I think, the main issue in the American diet that causes weight trouble. Most of what’s hanging out on the grocery store shelves contains huge amounts of highly-refined ingredients, which in turn allow us to eat large quantities without feeling full. Add sugar, fat, and salt and you’ve created the drug that so many of us get hooked on.

Fortunately, many farmer’s markets (including Arlington for those of you in my area) stay open year-round, and more and more natural food stores are opening up and forcing competition with some of the chains. While it’s still more expensive than a trip to Safeway, I find that I am able to stretch the ingredients I buy further because I’m eating less. (We did have more than half of a pizza left yesterday!)

If you want to try some different flavors, replace the whole wheat pastry flour with garbanzo bean or white bean flour. It’s a neat texture difference and really nice if you have a bit of a gluten-sensitivity(it is not, however, gluten-free).

That’s all for now! Hopefully, the next few weeks will mean more time to experiment while I’m on break from school. If you have a recipe that you’d like to see reformed for a clean diet, please shoot me an e-mail at bananafish711@gmail.com. I’d be glad to give it a go!

Ciao friends!
-Neen

Warm and Wonderful

25 Sep

Fall is in the air! I actually needed a sweater yesterday and this morning. My office is always a little icy, so I keep a cardigan there, but today called for one right out of the door. I’m certainly not complaining. The days are pleasant here and I’m looking forward to a temperate autumn.

The crisp air did, however inspire me to make a very cozy Roasted Cauliflower, Leek, and Garlic Soup that came out rich, creamy, and at a mere 70 calories per cup. Read on…

Cast of Characters

1 head of cauliflower, cut into florets
1/2 head of garlic, cut so that the cloves are exposed
3 leeks, (white/light green part only) sliced thick
3 cups low-sodium chicken broth
1 cup skim milk
3 bay leaves
A few grinds of black pepper
1/2 tbsp. sea salt
1-2 tbsp. extra virgin olive oil
Fresh parsley, basil, or basil puree for garnishing

Preheat an oven to 400 degrees Fahrenheit and place a baking sheet (lined with aluminum foil if you have it) on the middle rack.

While the oven/baking sheet are heating up, toss the cauliflower, leeks, and garlic with the oil, salt, and pepper. Once the oven is preheated, spread the mixture onto the baking sheet and roast, stirring occasionally for 25-30 minutes or until the cauliflower is lightly browned.

Remove the vegetables from the oven and set the garlic aside. Pour the other vegetables into a large saucepan (this is where that aluminum foil comes in handy!) and add the chicken broth and bay leaves.

Once it’s cool enough to handle, (about 5 minutes) squeeze the garlic out of its paper and add it to the soup. Discard the paper. Bring the soup to a boil and then reduce the heat and cover the pot. Simmer for 15 minutes or until the leeks and cauliflower are very tender.


The next step has several options. You can use either an immersion blender, countertop blender, or a food processor to puree the soup. I used my countertop blender and did it in two batches. Once pureed smooth, return the soup to the saucepan and stir in the milk. Taste and add seasoning if necessary.

Serve warm with a basil or parsley garnish. I can’t emphasize enough how much more flavor those vegetables have just from the roasting. Refrigerate for up to 5 days or freeze for up to a month. My batch is frozen into 5 small containers for afternoon snacks or as a side dish alongside roast chicken breast or pork chops.

What popped into my head upon tasting this was that you could make this a healthier substitute for mashed potatoes by using a lot less liquid, (say 1/2 cup chicken broth and 1/2 cup milk) and then processing to your personal desired consistency.

This recipe was adapted from Clean Eating Magazine’s most recent edition. Since they only publish 6 times a year, it included a special section on how to make a clean, healthy Thanksgiving meal. I was a bit doubtful at first, but after tasting that soup I can honestly say it would compliment a roast turkey excellently. Maybe I’ll bring some to Thanksgiving dinner this year…

I’ve been making so much soup lately that my freezer is absolutely packed to the brim. Consequently, I’ve been eyeing pressure canners on Amazon and waiting for a good sale. I have a hot water canner (great for tomatoes and fruits), but without pressure the water can’t get hot enough ensure the destruction of scary bacteria that could spoil low-acidic foods. I have nearly two cases of mason jars waiting to be filled and it would be a shame if they were left so lonely.

Plus, who doesn’t want a cupboard full of homemade soup? Living in Boston made me realize the importance of having a well-stocked pantry. I don’t know about you, but going to the store when the temperature is in the negatives isn’t my idea of a fun time. I think I’d rather curl up on the couch with some warm soup/stew, Joe, and Dioji. That sounds much better.

Okay, enough out of me for today. I hope everyone is having a great week—it’s almost the weekend! Joe and I have errands to run on Saturday (and I have schoolwork), but Sunday will hopefully be full of football and relaxation. Hooray!

Ciao for now, friends!

Catch a Falling Star (Cookie)

24 Sep


I’ve been thinking a lot about a concept called “clean eating” lately. Clean eating simply means consuming food in its most whole or natural state, or as close to that as you can get. It dedicates itself to the idea of mindfully planning healthy meals that satiate the body with nutrients, rejecting over-processed and refined foods. The result is a nourished body that maintains the glycemic balance I mentioned in my earlier post, “Are You Addicted?”

Some simple ways to head in the right direction:

-Replace refined white sugar or artificial sweeteners (Splenda, this means you!) with natural sweeteners like agave nectar, raw honey, grade-b maple syrup, 100% fruit juice, fruit pulp, stevia, or sucanat.

-Replace white flour with whole wheat flour (whole wheat pastry flour for more tender baked goods), or other milled whole grains. This not only benefits you nutrition-wise, but there are so many flavors to discover! Try nut flours, buckwheat, brown rice flour, spelt..etc..etc. The list goes on and on. Many of these are available in local organic markets, but if you can’t find them locally try Amazon or www.bobsredmill.com.

-Replace soda and sugar-laden juices with 100% fruit juices and (more importantly) water. Not a fan of plain water? Try sparkling water with a dash of fruit juice for a fizzy drink fix.

-Enjoy the whole produce section. Seriously, how many times have you passed up some different leafy greens in the produce section because you didn’t know what they were or how to cook them? I know I’ve done it. Visit a website like www.cleaneatingmag.com for some unique recipes on how to incorporate a variety of fresh vegetables and fruits into your diet. (I particularly like the format of their magazine because they denote which recipes freeze well—great for those of us with limited time during the week!)

I’ve come to a point in my journey where I’d like to try not to focus on numbers so much and instead listen more to my body. Do I feel full? If I feel hungry, is it head hunger or real hunger in my stomach? I’m still logging my food because I need to keep tabs on protein/vitamins. Also, reaching that kind of intuitive state is going to be difficult for me, and frankly I have a lot on my plate right now with school and work. It’s a goal I’ll reach someday, but I think it will be a slow transition. Who knows, though? Maybe meditating on it and learning to center myself will benefit me all around.

Now, you can’t possibly think that I would dare show you a picture of delicious star cookies without sharing the recipe! (I’d never be so cruel.) Those tasty morsels are my new treat. I’d advise freezing them in bags of 4-5 cookies each for easier portion control. I call them Whole Wheat Pie Crust Stars because they taste more like a lightly sweetened buttery pie crust than a sugar cookie. All I know is that they go great with cup of hot chocolate almond milk.

Whole Wheat Pie Crust Stars

1/2 cup rolled oats

3/4 cup whole wheat pastry flour

1/4 tsp. sea salt

1/4 tsp. baking soda

1/2 tbsp. cinnamon

1/4 cup butter

3 tbsp. blue agave nectar

1 tsp. vanilla extract

1/2 tsp. almond extract

1/4 cup low-fat buttermilk

1 tbsp. fructose

1 tsp. cinnamon

Preheat an oven to 400 degrees Fahrenheit

Mix the fructose and teaspoon of cinnamon in a small bowl and set aside.

Combine the flour, oats, salt, baking soda, and cinnamon in a bowl and mix thoroughly. Using a pastry cutter or the tines of 2 forks, cut in the butter until the mixture reaches the consistency of coarse cornmeal. Some pea-sized pieces are fine. Add the agave nectar, extracts, and buttermilk and mix until a stiff dough forms. If it’s too sticky, add a small amount of flour. Roll the dough into a ball and chill in the freezer for 10-15 minutes.

Roll the dough out to 1/8 inch thick on a lightly-floured board and cut into desired shapes with cookie or biscuit cutters. Lay the cookies on a baking sheet lined with parchment paper and sprinkle the fructose/cinnamon mixture over them. NOTE: Fructose is nearly twice as sweet as sugar, so use it very lightly. A tablespoon was enough for 40 star cookies.

Bake the cookies for 9-10 minutes or until the edges are just golden. Move immediately to a cooling rack. Serve warm or at room temperature.

Variation: Instead of cinnamon/fructose, try heating some all-fruit preserves until somewhat liquefied and drizzling them over the baked cookies. This works really well with spiced-apple preserves. It becomes an apple pie cookie!

The yield depends on the size of your cookie cutters. My small star cutter made about 40 cookies at 28 calories a piece. Not bad for a little treat! I bet crumbling 3-4 of them and adding them during the last 2-3 minutes of churning some protein ice cream would make a killer cookie ice cream.

Well that’s all from me today. I’ve got a lot of schoolwork, but I’m really glad I had some time to share my thoughts here. I really enjoy writing and hearing from all of you who try the recipes. Thanks for continuing to inspire me. Ciao for now, friends!

The Promised Pies

9 Sep

After living in England for a summer, I had a new found love for a particular portable food: the Cornish pasty. Whoever devised such a great way to use leftovers was certainly a savvy housewife. Tradition claims that the pasty was created as a way for tin miners to eat their lunch without having to return to the surface. A simple device, the pasty is nothing more than dough with a filling inside that’s then folded over, sealed, and baked. The traditional filling includes diced steak, onion, and potatoes, but today’s modern pasties are filled with a variety of sweet and savory options.

In an attempt to be a responsible WLS patient abroad, I limited my pasty eating to a bite here and there to try the various types. After watching a Good Eats episode titled “A Pie in Every Pocket,” and having a craving for a Pop-Tart the other night, I decided it was time to create a WLS-friendly pasty. I modified Alton Brown’s dough to get rid of the simple carbohydrates and add some much needed protein. Here’s what I came up with…

Apple Protein Pasties

Cast of Characters

3.5 oz. whole wheat pastry flour
1.25 oz. soy flour
2 scoops vanilla whey protein powder
1.25 oz. vegetable shortening
1/3 cup milk (I used skim)
1 tsp. baking soda
½ tsp. kosher salt
1.2 tsp. cinnamon

Combine all of the dry ingredients in a large mixing bowl. Using your fingertips or a pastry blender, cut in the shortening until the mixture has the consistency of cornmeal. Add the milk and mix until everything comes together. Turn the dough out onto a floured board and knead 10-20 times. If it is too sticky to knead, add a small amount of pastry flour.

Roll the dough out to about ½ inch thickness and cut out rounds using a 2 inch biscuit cutter. The dough should yield about ten of them. Roll each round out to about 5-6 inches in diameter and stack them (with wax paper in between) in the refrigerator for at least an hour. I just used some that I made last night, so it does keep overnight as long as it’s covered and cool.

Now it’s time to contemplate filling. I was really hankering for apple-cinnamon so I used some apple pie filling that I canned last fall. I’d recommend using homemade or all-fruit preserves and fillings as often as possible simply because it helps control the sugar content better. You could even use unsweetened applesauce and add some spices for a similar flavor. The possibilities are endless. Replace the vanilla protein powdered with unflavored for savory pies. Try a spoonful of leftover chili or some pizza sauce, cheese and finely diced pepperoni.

Once the dough rounds have chilled, mix together one egg and 2 tsp. of water. This egg wash will help seal the pies and keep them from coming apart in the oven.

Place one heaping spoonful of filling on one half of the round. Do not overfill—it will make a mess in the oven. With your fingertip, paint egg wash around the edges of the same side. Fold over the other half of the dough, pressing gently to remove any excess air. Crimp the edges with a fork to seal. Using a paring knife or kitchen shears, pierce 3 small vent holes in the top of each pie.

Bake the pies in a 350 degree oven for 20-25 minutes. Keep an eye on them after about 20 because soy flour browns very quickly.


Yum! Each dough round is 125 calories, 5 grams of fat, 13 grams of carbohydrates, and 7.5 grams of protein. The final product will depend on the filling you choose. With my apple pie filling, the total was about 150 calories. I had one at tea today and warmed it up for a minute in our toaster—it was heavenly. Wrapped in plastic wrap, fruit pies will keep for about a week. Meat pies should be refrigerated. For long-term storage, place the unbaked pies on a cookie sheet in the freezer. Once they’re frozen, put them in Ziploc bags and store. They can go straight from the freezer to the oven, but will take slightly longer to cook, maybe about 30 minutes.

So there are the pies, as promised. I hope you have a chance to enjoy making them, because they make a great quick lunch or snack. As for me it’s back to reading for school, so ciao for now friends!