Archive | Recipes RSS feed for this section

Flourless Chocolate Cake with Italian Meringue

15 Nov

Another birthday weekend! We celebrated Lynn’s (Joe’s mom) birthday this weekend with dinner on Friday night and brunch on Sunday. Who doesn’t love an multi-day birthday celebration?

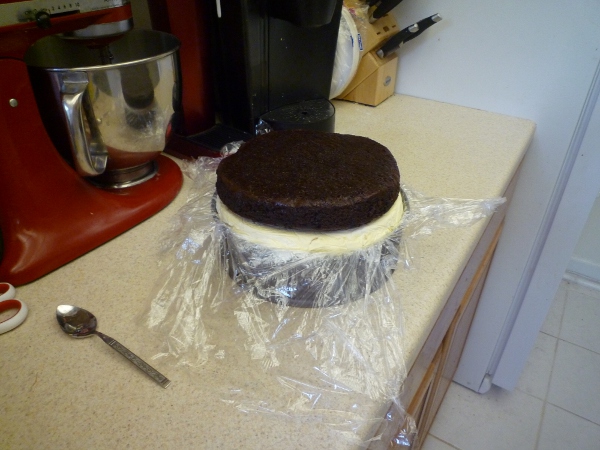
Of course this meant more cake baking (Yay!). But this time, I had to take into consideration that Lynn is avoiding eating a lot of excess sugar these days. She was certainly not adverse to a little something extra-special and loves chocolate, so I thought that the occasion called for something dark, rich and only slightly sinful: The Flourless Chocolate Cake.

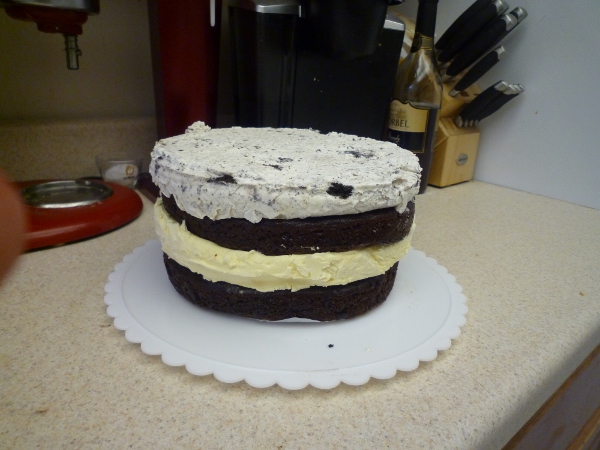
It has its sweetness, but the chocolate is the star. I played around with a few recipes, not wanting to tromp all over the chocolate flavor with a lot of butter and eggs. This version came out fudgy, dark, and rich. For the icing, I chose a light and fluffy Italian meringue. You don’t need very much (I used a little more than half of the recipe) for a one layer cake.

Flourless Chocolate Cake with Italian Meringue and Strawberries

Cake ingredients
-4 oz. dark chocolate
-1/2 cup butter
-3/4 cup sugar or sucanat (I used half and half—the latter has a lower glycemic impact)
-1/2 cup cocoa powder
-3 eggs, separated
-1 tsp. vanilla extract
-Pinch of salt

Method
-Grease and dust an 8 in. spring form pan with cocoa.
-Preheat the oven to 350 degrees F.
-In a saucepan over low heat, melt together the butter and chocolate and whisk until smooth.
-Remove the chocolate/butter mixture from the heat and whisk in the sugar, vanilla, salt and then the egg yolks (one at a time) until smooth.
-Sift the cocoa powder on top of the mixture and mix just until combined.
-Beat the egg whites to stiff peaks and then gently fold into the cake batter.
-Pour the batter into the spring form pan and bake for 25-30 minutes or until just set. Cool completely on a wire rack.

Italian meringue ingredients
-2/3 cup and 2 tbsp. sugar, divided.
-¼ cup water
-Pinch of salt
-3 egg whites
-1/4 tsp. cream of tartar

Method
-Combine the 2/3 cup of sugar, water, and pinch of salt in a saucepan over medium heat. Swirl the pan gently until the sugar dissolves and then cook without stirring until the mixture reaches 230 degrees F.
-While the sugar syrup is heating up, beat the egg whites and cream of tartar until foamy and then slowly add the 2 tbsp. sugar. Beat until medium peaks form.
-Once the sugar syrup has reached 230 degrees, remove it from the heat and allow the bubbles to dissipate. With the mixer on low speed, slowly add the sugar syrup to the egg whites and then increase the speed, add the vanilla, and beat until stiff peaks form.

Normally meringue does not store well, but the addition of the cream of tartar meant that I was able to keep this in a sealed container in the refrigerator for a day without it beginning to weep or shrink. Place a layer of wax paper directly on top of the meringue to avoid condensation from getting into it.

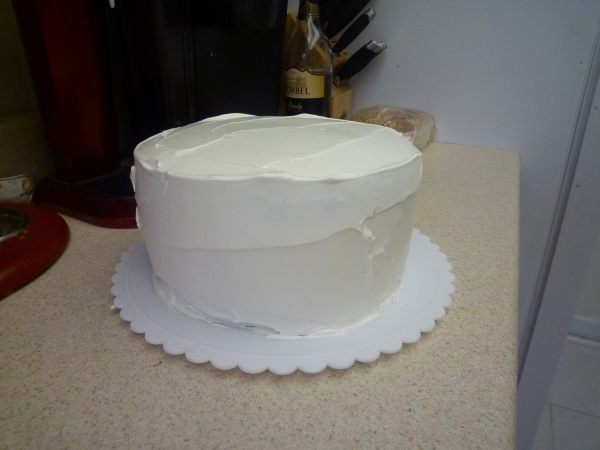
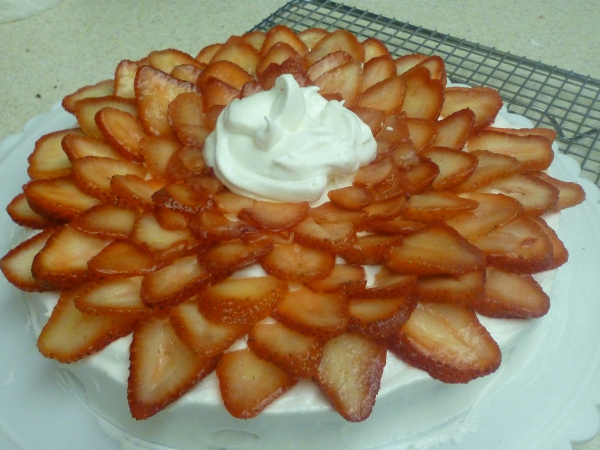
Spread an even layer of the meringue over the top and sides of the cake and then arrange sliced strawberries in overlapping circles. I wouldn’t recommend glazing them with anything as it will likely cause the icing to melt and spread.

Enjoy—and happy birthday again, Lynn!

Ciao for now,

Neen

Free Time for Croissants

8 Nov

I found out on Friday that I passed my graduate portfolio. I turned in the last several documents for it earlier in the week, and expected to receive revision recommendations from my advisor soon. I thought I’d likely spend this weekend tidying everything up. Instead, I opened my e-mail inbox to see the message subject line:  LIBR 289 CONGRATULATIONS CHRISTINA CERTO. I’d completed the requirements for the course.

I spent the next day in shock and then decided that a long set-aside culinary project was in order. I’d put off doing it due to time restraints–but this weekend presented the perfect conditions.

Anyway, time for Croissants!

Ingredients
3 1/2 cups flour
1 cup barely warm water
1 teaspoon active dry yeast
1/3 cup heavy cream
1 teaspoon salt
1 3/4 cups cold unsalted butter (3 1/2 sticks)

Method
-Mix 1 cup of the flour, the water, and the yeast together and then set aside to rest for one hour.
The mixture will become very foamy.

-Add the remaining flour, cream, and salt, then knead the mixture for one minute. Let the dough rest in a bowl covered in plastic wrap for 20 minutes.

-At this point you can either knead the dough by hand for about 10 minutes or in a mixer fitted with a dough hook attachment for 15 minutes on a low speed. Wrap the dough in plastic wrap and refrigerate for a half hour.

-Place the sticks of butter in between two sheets of plastic wrap and pound / roll them out into an 8 inch square.

-On a lightly-floured surface, roll out the dough to a 9 x 17 inch rectangle and place the square of butter on half of it:

-Fold the top of the rectangle over the square of dough and pinch the edges with your fingers to seal.

-Roll the dough into  9 x 18 inch rectangle…

and then letter-fold into thirds. Turn the dough so that the single-folded side is on the left:

-Roll the dough out to a 9 x 18 inch rectangle again and complete another letter-fold. Wrap in plastic wrap and chill for at least an hour. (I docked the top with two dots to note that I had completed two “roll-fold” cycles.

-Remove from the fridge, roll the dough out to a 9 x 18 inch square and letter-fold two more times. (A total of four). Cut the final letter-folded dough in half and wrap each in plastic wrap. Now the dough is ready for use, although aging it for a few hours or overnight will develop more flavor.

-Roll the dough out into two 6.5 inch by 20 inch rectangles. Place on two parchment-lined baking sheets and return to the refrigerator for 20 minutes.

-Dock the edges on each side of the rectangle to mark off triangles. Cut them out with a pizza cutter or small, sharp knife.

-Make a slit at the base of each triangle and roll slightly outward as you tightly roll up the croissants. Roll the triangle up so that the final tip is underneath and then bend the two ends toward one another to form the classic croissant shape.

-Arrange the rolled croissants on parchment-lined baking sheets, cover with plastic wrap and proof overnight in the refrigerator.
-When it is time to bake, remove the croissants from the refrigerator and leave them at room temperature for an hour.

Beat one egg and a splash of cream together and brush the mixture on top of the proofed croissants.

-Pre heat the oven to 375 degrees F and then bake croissants for 35 minutes or until puffed and deeply golden-brown. Cool on a wire rack and enjoy the buttery flaky goodness.

Ciao for now,

Neen

Hallow-Mallows

31 Oct

It’s really too bad that you can’t give out homemade candy to trick-or-treaters without parents being wary of your sanitation practices or fearing you might have mistaken arsenic for the vanilla extract. I love to make candy, especially marshmallows. They take very few ingredients, not a ton of time, and can be flavored hundreds of different ways just by switching out the extract or adding spices or crushed candy to the final dredge. This Halloween version has a sweet vanilla-bean middle with a crunchy chocolate topping, better than any bag of long-ago packaged candy. Mmm.

Chocolate-dipped Marshmallows

Ingredients
3 envelopes of unflavored gelatin
1/2 cup cold water

2 cups sugar
2/3 cup light corn syrup
1/4 cup water
1/4 teaspoon salt
1/2 of a vanilla bean, split and scraped or 1 tsp. vanilla extract
Orange food coloring

6 oz. semi-sweet chocolate chips

1/2 cup cornstarch mixed with 1 cup of powdered sugar.

Method
Grease a 9×13 in. pan and cover it with a layer of the cornstarch/powdered sugar mixture. (Reserve the rest for dredging the marshmallows later.)

In the bowl of an electric mixer fitted with a whisk attachment, combine the gelatin and 1/2 cup cold water. Let bloom for 10 minutes while preparing the sugar syrup.

In a large saucepan over medium-high heat, combine the sugar, corn syrup, 1/4 cup water, salt, and vanilla. Stir gently to dissolve the sugar and then let the mixture come to a boil. Boil for 1 minute and then remove from the stove. Allow the bubbles to dissipate.

Turn the mixer onto its lowest setting and slowly add the sugar syrup to the gelatin. When all of the syrup has been added, turn the mixer to the highest setting and whip for 12 minutes. When there are about 2 minutes left, begin adding food coloring until the desired shade of orange is reached.

After whipping for 12 minutes, you should have a fluffy, shiny, creamy marshmallow mixture. Using a greased spatula to get as much as you can (you will not get it all, trust me) pour the mixture into the 9×13 in. pan. Then, quickly grease your hands  and use them to spread the marshmallow into an even layer. Sprinkle another layer of the cornstarch/powdered sugar mixture on top. Let set for about an hour in the pan. When you can press a finger on top of the marshmallows and they spring back, they are ready to remove from the pan.

Flip the rectangle of marshmallow onto a cutting board and cut into squares using a pizza wheel. Toss the squares in the remaining cornstarch and powdered sugar to keep them from sticking together. Store in an airtight container.

Melt the semi-sweet chocolate chips over very low heat and mix the melted chocolate until it is smooth and shiny. Dip one side of the marshmallow into the chocolate, swirling gently to coat evenly and then place on a cooling rack to dry. Makes about 90 marshmallows.

Happy Halloween!
Ciao for now,

Neen

An Ice Cream Layer Cake for Roger

18 Oct

Celebration cakes are my favorite cakes to make. I’m not particularly apt at piping icing designs or writing messages, but I can usually come up with something creative to complement the flavors under the icing. The person the cake is to be for inspires me with their choice of flavors and then from there…a blank canvas. No rules, no rubrics to follow, no required homework, just good creative fun.

When Joe told me several weekends ago that his dad’s birthday was coming up, I offered to make the cake and asked what kind he thought Roger (his dad) would like.

“Can you make an ice cream cake?”

I had no idea. I didn’t even know if I had a powerful enough freezer, or for that matter, one with enough space to freeze multiple cake layers. I resolved to try, because (as they say) if you don’t try, you’ll never know.

One thing I did know was that Roger loves chocolate, so what better to include than my personal favorite perfect chocolate cake recipe. I made two 9in. layers of Ina Garten’s Beatty’s Chocolate Cake. After cooling completely on a rack, they were wrapped and placed in the freezer to firm up.

The next step was to create the ice cream layers. After lining two nine-inch rounds with plastic wrap (so I could lift the layers out later), I scooped and flattened softened ice cream into each–cookies and cream in one, and vanilla in the other. Using an offset spatula, I smoothed the surfaces even as best I could, then covered each with another layer of plastic wrap and then put them in the freezer to harden.

 After a day, I lined a springform pan with plastic wrap and stacked the layers together. First the cookies and cream ice cream, then a layer of chocolate cake, then the vanilla ice cream and finally the second chocolate cake layer. I wrapped the whole cake tightly in plastic wrap and returned it to the freezer.

Two days later, I turned the cake out of the springform pan and onto a turn table. By that time, the layers had frozen firmly together and I was able to do a quick crumb coat of icing. I used Cool Whip, by the way, as it will firm up in the freezer, but won’t get too hard. I let another 8 or so hours pass and then put on a final coating. I also moved the cake from the turn table to an aluminum foil covered piece of cardboard that I’d cut to fit inside of a cake box that the kind folks at the bakery near my office had graciously given to me.


As for decorating? Well, by the time I’d iced the cake I was so amazed that it had actually come together that I was hesitant to ruin it with a bad attempt at writing “happy birthday” on top. What I did instead gave me a lot of flexibility.
I melted a bag of semi sweet chocolate chips over low heat, mixing constantly until just smooth. I then poured the melted chocolate into a pastry bag fitted with a rounded point and piped lots of little shapes onto big sheets of wax paper. I made swirls, stars, zig-zags, curls and other odd little designs that I thought might look interesting. After they hardened, I topped the cake with them by gently pressing an edge of each into the icing until it stood. I wanted an explosion of chocolate stars and fireworks bursting forth from the icing. Because this cake, if it were to personify anything, I would want it to be joy.

With the freezer turned to its highest setting, I returned the cake to it once more to prepare for its final 10 minute trip to Joe’s parents’ house.

Fortunately, Joe had pre-warned his mom to make freezer space, and it was quickly tucked away to wait patiently for its unveiling after dinner.

At last I saw it opened, still decorated and stable, and was finally able to breath a sigh of relief.

And the inside looked really cool!

I was really proud of this, especially once I saw how well it held up after we took a few slices out. Aside from the icing starting to get soft, the layers of cake and ice cream remained remarkably firm and tasted oh-so-good. After Roger had two slices, I felt comfortable in assuming that it was in fact, delicious.

What I learned throughout this little endeavor is that ice cream cake doesn’t take a ton of time on any given day, just the patience to take small steps in between freezings. While it took me the course of a week to make, I worked on it for maybe 5 minutes each day either stacking, unmolding, icing, or decorating. An exercise in patience? Yes.

Worth it in every way when I saw the smiles on the faces of the folks around me eating it? You bet.

Ciao for now,
Neen

Mystery Food Week 20: Grand Finale edition

14 Oct

Well here it is, the final week of Mystery Food 2010. The season seems to have come and gone in the blink of an eye this year. Here’s week 20:

Butternut squash, sweet potatoes, green beans, apples, and beets. How wonderfully autumn!

I still have last week’s pumpkin and an array of squash, so there will undoubtedly be a lot of canning this weekend. I got around to taking care of some of the apples over the weekend after finishing the first round of Project Boerewors. (First round because the boss gave me some ideas for improvement and delicious culinary projects take time and refinement.)

But yes, about those apples. I had planned to can pie filling because Rome apples stand up incredibly well in baking applications, but alas I forgot to order some Clear-Jel before the weekend. I’ve never found a store that sells it and usually buy a bag online just as fall starts specifically for the purpose of making pie filling. Clear-Jel is cornstarch that has been modified to withstand the high temperatures that it is exposed to during the canning process without becoming cloudy or losing its thickening ability. So, no pie filling…yet.

So I did what any resourceful food preservation lover might and turned to my trusty Ball Complete Book of Home Preserving and looked in the index under “apples.” An overwhelming number of recipes poured off of the page, but I was looking for something a bit simple. (I’ll tell you why later.) One recipe caught my eye and with only 4 essential ingredients it was a perfect project for the day:

Brandied Apple Rings

Ingredients
5 lbs. apples, cored and cut into ¼ inch rings, treated with lemon juice or citric acid to prevent browning.
3 cups water
4 cups sugar
1 cup brandy
Red food coloring (optional, but makes this look oh-so-pretty.)

Method
-Bring sugar and water to a boil in a saucepan large enough to fit all of the apples. Boil sugar and water for 5 minutes.
-Remove from the heat and add the apples and food coloring. A few drops of food coloring is all you need. Let the mixture boil gently for 15 minutes or until the apples are tender.
-Again remove the pan from the heat and remove the apples from the syrup using a slotted spoon.
-Pack the apples loosely into clean, warm jars, leaving ½ inch headspace.
-Put the saucepan back on the heat and return the syrup to a boil for one minute. Remove from the heat and stir in the brandy.
-Pour hot syrup over apples, leaving ¼ inch headspace. Tap the sides of the jars to remove air bubbles and then adjust the headspace if necessary.
-Wipe the rims of the jars clean and then place on the lids and screw on rings.
-Process jars in a boiling water bath for 15 minutes.

The apples are tasty warm, but I bet they are even better after sitting in that brandy-syrup for awhile. They are a lovely accompaniment to fall pork dishes and would also make a slightly more elegant strudel.

By the way, if you have syrup left over after filling the jars, put it back on the stove over medium heat and let it reduce to a thicker consistency. Add a few shakes of cinnamon and you’ll have a delicious topping for ice cream, waffles, cheesecake, or a spoon!

So, why did I go for a simple apple recipe over a more ingredient-heavy chutney, salsa, or multi-fruit jelly? I guess you’ll have to wait until I post about Project Ice Cream Layer Cake later this week… 😉

Ciao for now,

Neen

Boerewors: A Sausage-Making Adventure

10 Oct

I always like a culinary challenge, and this one was especially intriguing given that I really had no idea how the final product was supposed to taste. My boss was looking for a butcher in the area that would make a particular type of South African sausage when I piped up that I had a meat grinder. “What’s in it?”

He showed me a recipe and I consulted a few other resources online to get a sense of the cuts of meat used, seasoning blends, and meat to fat ratio. Once I felt like I had a better sense of the flavors, I settled on the ingredients for a batch.

Boerewors


Ingredients

3.5 lbs. beef chuck
1 lb. lamb shoulder
1 lb. pork shoulder
5 oz. pork fatback (salted)
3.5 oz. sheep casings
5 tbsp. malt vinegar
3 tbsp. coriander seeds, toasted and then ground.
1 tbsp. salt
1 tbsp. ground pepper
1/2 tsp. ground cloves
1/2 tsp. fresh ground nutmeg
1/4 tsp. allspice

Method

First thing’s first: Soak your sausage casings. Sheep casings frequently come in tubs packed with salt and can be preserved that way in your fridge for almost a year with no negative consequence. Soak in water that starts at 110 degrees F. while you prepare your meat and spice blends (or at least 30 minutes).

The fatback will also require a pre-soak, but in a medium-sized saucepan with boiling water for about 5-7 minutes. This will remove some of the excess salt. After boiling, pull the fatback out of the water and refrigerate for a little bit to firm it up.

Dice the lamb, pork, beef, and fatback into small cubes.

In a small bowl, combine the coriander, salt, pepper, cloves, nutmeg, and allspice. Set aside.

Next, grind the meat using a coarse plate.

Now it’s time to add the spices and vinegar. Take care not to smash the meat together too much when mixing everything together.

Make yourself a small patty and fry it quickly to test the seasoning. Mine needed a few extras pinches of salt and another few grinds of pepper. Otherwise, it was delicious!

To stuff the sausage, I used the 5/8 in. tube attachment for my mixer’s grinder. Before getting the casing onto the tube, find the opening in the casing and run cool water down the length of it to remove any kinks that weren’t straightened out during the soaking process. Grease the tube with a little bit of vegetable shortening and then gently shimmy on the casing. Tie a knot at the end of the casing and you’re ready to stuff!

At this point, have a pin handy so that you can prick the casing if any major air pockets form.

With the mixer on a low speed, feed the seasoned meat into the hopper and through the tube. The casing should slide easily as the meat is fed into it. Do not overfill or you run the risk of tearing the casing or having it burst during cooking.

When you reach the end of the casing, leave 2 inches or so empty so that you can tie a knot to seal it off. Roll the sausage into spirals and prick with a pin all over to remove excess air.

Hypnotizing meat spiral…mmm.

So there you have it; my first foray into making boerewors. I’m really pleased with the final product and hope that the boss-man enjoys grilling it up as much as I enjoyed making it.

Ciao for now,
Neen