Archive | Advanced RSS feed for this section

An Ice Cream Layer Cake for Roger

18 Oct

Celebration cakes are my favorite cakes to make. I’m not particularly apt at piping icing designs or writing messages, but I can usually come up with something creative to complement the flavors under the icing. The person the cake is to be for inspires me with their choice of flavors and then from there…a blank canvas. No rules, no rubrics to follow, no required homework, just good creative fun.

When Joe told me several weekends ago that his dad’s birthday was coming up, I offered to make the cake and asked what kind he thought Roger (his dad) would like.

“Can you make an ice cream cake?”

I had no idea. I didn’t even know if I had a powerful enough freezer, or for that matter, one with enough space to freeze multiple cake layers. I resolved to try, because (as they say) if you don’t try, you’ll never know.

One thing I did know was that Roger loves chocolate, so what better to include than my personal favorite perfect chocolate cake recipe. I made two 9in. layers of Ina Garten’s Beatty’s Chocolate Cake. After cooling completely on a rack, they were wrapped and placed in the freezer to firm up.

The next step was to create the ice cream layers. After lining two nine-inch rounds with plastic wrap (so I could lift the layers out later), I scooped and flattened softened ice cream into each–cookies and cream in one, and vanilla in the other. Using an offset spatula, I smoothed the surfaces even as best I could, then covered each with another layer of plastic wrap and then put them in the freezer to harden.

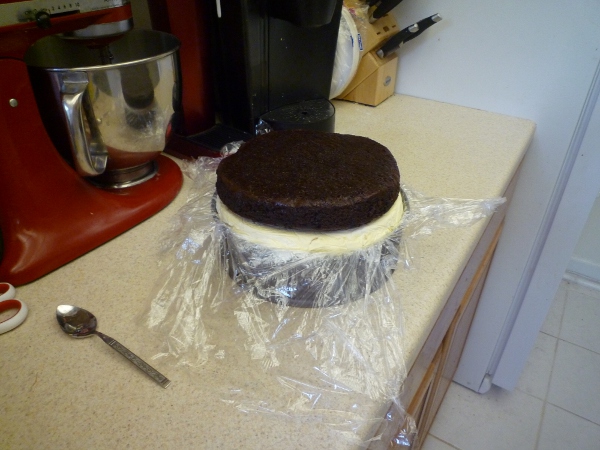
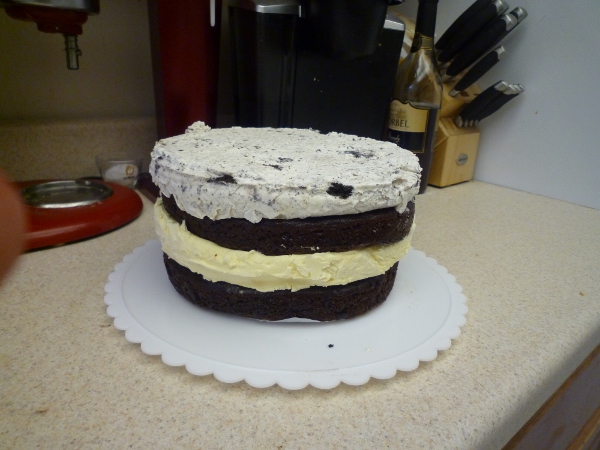
 After a day, I lined a springform pan with plastic wrap and stacked the layers together. First the cookies and cream ice cream, then a layer of chocolate cake, then the vanilla ice cream and finally the second chocolate cake layer. I wrapped the whole cake tightly in plastic wrap and returned it to the freezer.

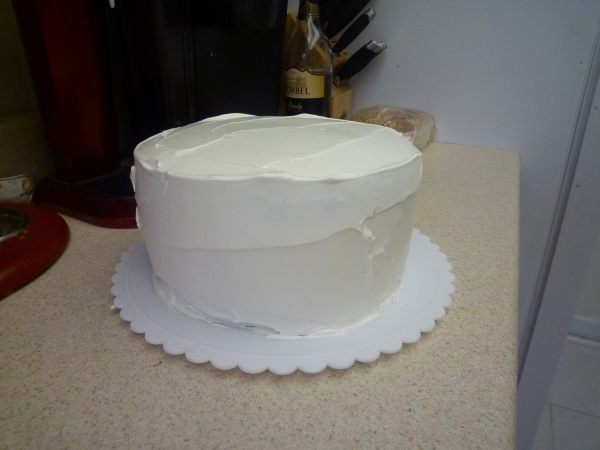
Two days later, I turned the cake out of the springform pan and onto a turn table. By that time, the layers had frozen firmly together and I was able to do a quick crumb coat of icing. I used Cool Whip, by the way, as it will firm up in the freezer, but won’t get too hard. I let another 8 or so hours pass and then put on a final coating. I also moved the cake from the turn table to an aluminum foil covered piece of cardboard that I’d cut to fit inside of a cake box that the kind folks at the bakery near my office had graciously given to me.


As for decorating? Well, by the time I’d iced the cake I was so amazed that it had actually come together that I was hesitant to ruin it with a bad attempt at writing “happy birthday” on top. What I did instead gave me a lot of flexibility.
I melted a bag of semi sweet chocolate chips over low heat, mixing constantly until just smooth. I then poured the melted chocolate into a pastry bag fitted with a rounded point and piped lots of little shapes onto big sheets of wax paper. I made swirls, stars, zig-zags, curls and other odd little designs that I thought might look interesting. After they hardened, I topped the cake with them by gently pressing an edge of each into the icing until it stood. I wanted an explosion of chocolate stars and fireworks bursting forth from the icing. Because this cake, if it were to personify anything, I would want it to be joy.

With the freezer turned to its highest setting, I returned the cake to it once more to prepare for its final 10 minute trip to Joe’s parents’ house.

Fortunately, Joe had pre-warned his mom to make freezer space, and it was quickly tucked away to wait patiently for its unveiling after dinner.

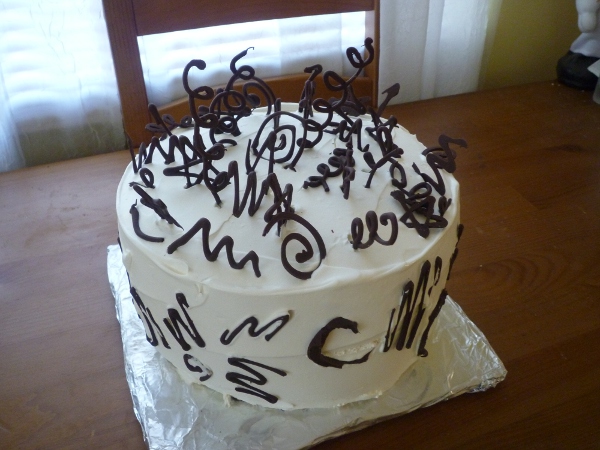
At last I saw it opened, still decorated and stable, and was finally able to breath a sigh of relief.

And the inside looked really cool!

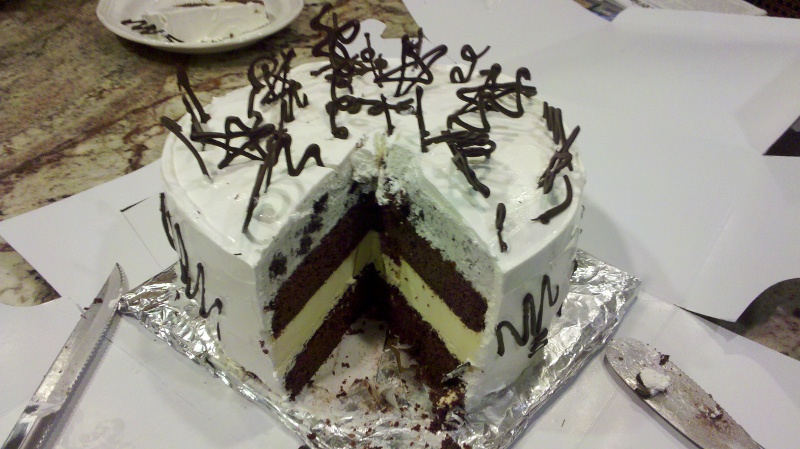
I was really proud of this, especially once I saw how well it held up after we took a few slices out. Aside from the icing starting to get soft, the layers of cake and ice cream remained remarkably firm and tasted oh-so-good. After Roger had two slices, I felt comfortable in assuming that it was in fact, delicious.

What I learned throughout this little endeavor is that ice cream cake doesn’t take a ton of time on any given day, just the patience to take small steps in between freezings. While it took me the course of a week to make, I worked on it for maybe 5 minutes each day either stacking, unmolding, icing, or decorating. An exercise in patience? Yes.

Worth it in every way when I saw the smiles on the faces of the folks around me eating it? You bet.

Ciao for now,
Neen

Boerewors: A Sausage-Making Adventure

10 Oct

I always like a culinary challenge, and this one was especially intriguing given that I really had no idea how the final product was supposed to taste. My boss was looking for a butcher in the area that would make a particular type of South African sausage when I piped up that I had a meat grinder. “What’s in it?”

He showed me a recipe and I consulted a few other resources online to get a sense of the cuts of meat used, seasoning blends, and meat to fat ratio. Once I felt like I had a better sense of the flavors, I settled on the ingredients for a batch.

Boerewors


Ingredients

3.5 lbs. beef chuck
1 lb. lamb shoulder
1 lb. pork shoulder
5 oz. pork fatback (salted)
3.5 oz. sheep casings
5 tbsp. malt vinegar
3 tbsp. coriander seeds, toasted and then ground.
1 tbsp. salt
1 tbsp. ground pepper
1/2 tsp. ground cloves
1/2 tsp. fresh ground nutmeg
1/4 tsp. allspice

Method

First thing’s first: Soak your sausage casings. Sheep casings frequently come in tubs packed with salt and can be preserved that way in your fridge for almost a year with no negative consequence. Soak in water that starts at 110 degrees F. while you prepare your meat and spice blends (or at least 30 minutes).

The fatback will also require a pre-soak, but in a medium-sized saucepan with boiling water for about 5-7 minutes. This will remove some of the excess salt. After boiling, pull the fatback out of the water and refrigerate for a little bit to firm it up.

Dice the lamb, pork, beef, and fatback into small cubes.

In a small bowl, combine the coriander, salt, pepper, cloves, nutmeg, and allspice. Set aside.

Next, grind the meat using a coarse plate.

Now it’s time to add the spices and vinegar. Take care not to smash the meat together too much when mixing everything together.

Make yourself a small patty and fry it quickly to test the seasoning. Mine needed a few extras pinches of salt and another few grinds of pepper. Otherwise, it was delicious!

To stuff the sausage, I used the 5/8 in. tube attachment for my mixer’s grinder. Before getting the casing onto the tube, find the opening in the casing and run cool water down the length of it to remove any kinks that weren’t straightened out during the soaking process. Grease the tube with a little bit of vegetable shortening and then gently shimmy on the casing. Tie a knot at the end of the casing and you’re ready to stuff!

At this point, have a pin handy so that you can prick the casing if any major air pockets form.

With the mixer on a low speed, feed the seasoned meat into the hopper and through the tube. The casing should slide easily as the meat is fed into it. Do not overfill or you run the risk of tearing the casing or having it burst during cooking.

When you reach the end of the casing, leave 2 inches or so empty so that you can tie a knot to seal it off. Roll the sausage into spirals and prick with a pin all over to remove excess air.

Hypnotizing meat spiral…mmm.

So there you have it; my first foray into making boerewors. I’m really pleased with the final product and hope that the boss-man enjoys grilling it up as much as I enjoyed making it.

Ciao for now,
Neen

Mystery Food Week 17: Pickled edition

23 Sep
Fall is here. I actually needed to throw on a cardigan this morning to go outside. For the last few months, I’ve only needed one inside because my office is frequently arctic. It must be better for the books. Or they’re secretly housing penguins on Deck C. I think I’ll keep believing that—specifically, penguins in early modern costume. Adorable.
I’ve been stockpiling at least some of the last few weeks’ worth of squash and eggplant for pickling and finally got around doing that over the weekend. After suffering from some kind of chest cold that wiped me out for two weeks, I’d accumulated a whole lot of food in the fridge. Friday night was pickle-fest, and Saturday was apple-pear butter day. Fridge clean, pantry full, life good.
Sunny Squash and Eggplant Pickles

Ingredients:
-4 cups seeded and cubed squash (I used summer, patty-pan, and zucchini) and eggplant
-1 cup sliced onion
-2 cups water
-1 cup sugar
-1 cup white vinegar
-1 tsp. plain salt (not iodized)
-1 ½ tsp. dry mustard
-½ tsp. turmeric
-½ tsp. ground ginger
-A pinch of saffron threads

Method:
-Combine all ingredients except the squash and eggplant in a large saucepan over medium-high heat and bring to a boil. Add the vegetables and return to a boil for 10 minutes.
-Using a slotted spoon, pack the vegetables into warm, sterilized jars, leaving ½ inch headspace.
-Add enough of the pickling liquid in the saucepan to cover the vegetables in each jar.
-Secure lids and rings onto jars and process in a boiling water bath for 10 minutes.

Pickled Beets and Onions

Ingredients:
-4-6 large beets (see: last week’s mystery food)
-1 large white onion, sliced
-2 ½ cups white vinegar
-1 cup sugar
-3 tbsp. pickling spice (usually in the baking aisle with other spices)

Method:
-To prepare the beets, scrub them gently and then boil for 20-40 minutes or until just tender. Rinse with cool water. Slide off the skins and quarter or halve depending on the size.
-In a large saucepan, combine the rest of the ingredients and bring the mixture to a boil over medium-high heat. Reduce the heat slightly and boil gently for 15 minutes.
-Add the beets and return the mixture to a boil.
-Using a slotted spoon, pack the beets and onions into jars leaving ½ inch headspace.
-Add enough of the pickling liquid in the saucepan to cover the vegetables in each jar.
-Secure lids and rings onto jars and process in a boiling water bath for 10 minutes.

With all of that squirreled away, there was finally space in the fridge for this week’s Mystery Food. And boy is it a good one…

Tomato, cherry tomatoes, squash, sweet corn, apples, potatoes, green peppers, and swiss chard. The cherry tomatoes are so sweet. I had some in a wrap with black forest smoked turkey and provolone cheese from the deli and it was such a delicious contrast.

Joe’s folks are away at the beach for the weekend and have absconded with our dog. Yes, that’s right, he gets a vacation from his difficult life of being spoiled. But that does mean that Joe and I can go out after work on Friday without one of us having to run home to Virginia first. And I can cook squash without a pouty face staring at me begging for some (he is weird). Cool.

Ciao for now,
Neen

Mystery Food Week 16: Purple Hands edition

16 Sep

Oh okay, they aren’t purple anymore. But they were decidedly still a tinge purply on Tuesday when I received this week’s Mystery Food. I finally got around to making grape jelly from the 3 bunches of concord grapes received in recent CSA boxes. The process was fairly easy too. Try it out sometime!

Concord Grape Jelly

Ingredients
5 cups of grape juice
3 1/2 cups of sugar
1 box of powdered pectin

Method
To make the grape juice, remove the grapes from the stems and wash them. Place the grapes in a pot and mash them up. Over medium-high heat, bring the grapes to a simmer and cook for 10 minutes, smashing them every so often.

Line a sieve with cheesecloth and place it over a large pot. Pour the hot grape mash into the sieve and strain for several hours or overnight.

Once juice has collected, rinse the cheesecloth and run the juice through the sieve into a pot one more time to remove any sediment.

To make the jam, mix the package of pectin with 1/4 cup of the sugar and sprinkle it into the grape juice. Bring this mixture to a rolling boil over medium-high heat, stirring frequently.

Once boiling, add the rest of the sugar and return to a rolling boil while mixing constantly. Let the jelly boil for 1 minute and then remove it from the heat.

Ladle into clean, warm jars and then secure the lids and rings. Process jars in a boiling water bath for 10 minutes.

Share if you must. I made half of this recipe and it yielded three half-pint jars.

Onto this week’s Mystery Food:

Zucchini, squash, tomatoes, cherry tomatoes, beets, green beans, peppers, apples and Asian pears.

The apples have been hit or miss. Some are a little bit grainy, but they’ll be good for fruit butter. I have a lot of apples and pears hanging around, so I will probably throw most of it into the crockpot this weekend with some spices and a little bit of juice. If you just let it cook on low all day, giving it a stir or a mash every few hours, it becomes a warm and tasty sauce. To reduce it for fruit butter, vent the crockpot lid with a chopstick or skewer.

As for the veggies, zucchini and tomato season is one of my favorite parts of the early fall. I love coming home and making a quick braised vegetable dish with chopped zucchini, tomatoes, onions, garlic, and then seasoning it with a little bit of cayenne pepper and saffron. It’s a fast, easy dinner and you can add whatever protein you have hanging around to make it more substantial. Light fish, like tilapia or haddock is really pleasant, as is ground turkey or bison.

I hope everyone’s fall has gotten off to a great start. It has been absolutely lovely in DC this past week.

Ciao for now,
Neen

Project Yogurt: Fun with Fermentation

10 Mar

It’s an underestimation to say that I like yogurt…

I find it hilarious to type that because it was only a few years ago that I distinctly recall wretching at the taste of the various low-sugar/low-fat yogurts I tried to choke down in a vain attempt to get some protein. To me, most of it tasted like chalky, artificially-flavored goop. I decided that yogurt just wasn’t for me and it never would be.

Then I started using it in baking. As you’ve probably noticed if you read this blog regularly, I use Greek-style plain yogurt as a replacement for oil or buttermilk in a lot of my recipes. At the outset, it was just to add some protein, but along the way I found that it brought a softness to the texture of muffins/quick breads that applesauce or other fruit puree didn’t seem to copy. It was a win-win situation in my head: the benefit of yogurt without the taste!

One day at the farmer’s market, the vendor I regularly bought ricotta cheese from was selling tubs of fresh, homemade Greek-style yogurt. “Alright,” I thought, “maybe I’ll like fresh yogurt. After all, I can flavor it myself and peaches are in season.” At worst, it would end up in my latest loaf of strawberry bread. Not a bad fate.

But that yogurt was destined for greater things. One spoonful and I was hooked. I started eating it nearly every day with a touch of raw honey and whatever fruit I could find. Peach-cinnamon, strawberry-apple, blueberry-banana…the possibilities were endless. It was so rich and creamy I found it hard to believe that it was fat free, but the vendor swore up and down that it was. Soon, every week I came home from the market with at least 2 tubs of it that might last the week (if I was lucky).

Then came winter. And we were pummeled with snow. I couldn’t get to the market as often and missed my yogurt. In vain, I searched for a store brand that didn’t taste goat-cheesy (not my thing), runny (gross), or somehow…off. (I get it, I’m picky about yogurt. Sue me.) I even tried the more expensive, organic “all-natural” flavored ones and they were tasty, but had enough sugar to make me remember why I’d scratched them off the list years ago.

I also began to consider just how much money I was spending on that particular dairy product (oh dear). The label read only: skim milk, non-fat dry milk, live active cultures. Could it really be so hard to just make it myself?

Answer: Nope.

And here’s how I did it…

Basic Yogurt


*image from treehugger.com

Ingredients and Equipment

-2 quart-sized mason jars with lids and rings. Plastic containers are also fine, but make sure you sterilize whatever you use. I do this by putting the jars in my dishwasher on a heated dry cycle. Leaving them in a pot of boiling water for 5-10 minutes works too.
-1 large saucepan.
-1 candy/fry/probe thermometer that you can leave in said saucepan.
-A warm place for incubating. I created a small incubator by placing a heating pad set to “low” on the bottom of an insulated cooler and placed the jars of yogurt on top of that. A crockpot set to “keep warm” works well, as does simply wrapping up the containers in thick bath towels and setting them in a warm place in your house.
-Half-gallon of the milk of your choice. It can be pasteurized, but avoid ultra-pasteurized varieties as it is more difficult to cultivate the necessary bacteria in these. I used skim milk, but any fat content will do.
-1/2 cup of plain yogurt containing live active cultures OR a powdered yogurt starter (which can be found on Amazon.com). I used a small container of store brand plain, non-fat yogurt.
-1/2 cup of non-fat dry milk to aid in thickening.

For thicker, Greek-style yogurt, you will also need a colander lined with several layers of coffee filters or cheesecloth set over a large bowl.

Method

-Begin by placing the half gallon of milk in a heavy-bottomed saucepan and putting the pan over medium heat. Clip the candy or fry thermometer to the saucepan and allow the milk to heat to 185 degrees F.
-Remove the saucepan from the heat and allow the milk to cool to 110 degrees F. (You can do this quickly by gently setting your saucepan in a sink full of very cold water.)
-Once the milk cools to 110 degrees F, add the 1/2 cup yogurt and 1/2 cup dry milk and whisk until smooth. Ladle this mixture into the jars or containers and secure lids and rings.
-Incubate the yogurt in a warm place for 7-8 hours. At this point, it will have thickened and some liquid (whey) will probably have settled on the surface.

At this point, you may CHOOSE YOUR DESTINY!

You can either move the jars directly from incubation to the refrigerator. After several hours of cooling (overnight is best), you will have delicious yogurt that can then be flavored with any number of things. Fruit puree, jam, raw honey, cocoa powder/raw honey, agave, cinnamon, and even herbs are all great.

Or if you’re like me and love the thick, rich flavor of Greek-style yogurt, pour the just-incubated yogurt into a colander lined with several layers of coffee filters or cheesecloth set over a large bowl. Set that in the refrigerator and allow it to strain for several hours. You will be left with a colander full of thick, wonderful, protein-rich yogurt and a bowl full of whey (which you can discard or use in other recipes). Ladle the yogurt back into the jars and store in the refrigerator.

What does one do with nearly two quarts of yogurt? Well if you’re like me that won’t last you very long, but if you need some ideas these are my favorites:

-Mix 6oz. yogurt with 1 tbsp. all-fruit strawberry preserves and a drop of vanilla extract for strawberry creamsicle yogurt.
-Mix 6 oz. yogurt with 1/2 tbsp. raw buckwheat or apple blossom honey and a shake of cinnamon. This goes great on top of diced apples or peaches.
-Mix 2-3 tbsp. yogurt with a can of tuna, some Dijon mustard, and assorted vegetables for a high-protein tuna salad.
-Mix 4oz. yogurt with one small cucumber, pinch of thyme, and cayenne pepper and use it as a spread on sandwiches or as a vegetable dip.
-Mix 4oz. yogurt with 1 head of steamed, diced cauliflower, a dash of cayenne pepper, onion powder, garlic powder, and a handful of parmesan cheese.
-Blend 4oz. yogurt with 4oz. light cream cheese, a can of drained artichoke hearts, a few tbsp. of parmesan cheese, herbs, dry mustard, and some sautéed leafy greens and garlic for a fantastic dip.
-Use in Zucchini-Apple Quick Bread (see the post before this one!)

So you see, yogurt has a multitude of sweet and savory uses. Usually, if a recipe calls for sour cream or mayonnaise, I like to see if part or all of that can be replaced with yogurt. It adds a significant amount of protein and is also a great source of calcium.

There you have it: Yogurt 101. Go to it!

Cheers,
Neen

Cooking from the Heart…

9 Sep

I strive to be a really positive influence on others, but we all experience times of doubt and insecurity. Sometimes, I don’t think I am as honest with my readers as I could be about the struggle that is a part of healthy eating and living. The truth is that for as often as I am happy about the progress I have made, there are days where I beat myself up. It could be that I finally broke down at the deli and bought a candy bar after months of clean eating, or simply that I woke up that morning I didn’t like what I saw in the mirror. There’s a part of me during those moments that knows it’s time for a reality check, but sometimes that voice can get stifled.

Food and I have a tenuous relationship. As humans, we need sustenance to live. At a young age we come to acknowledge those who provide us with that sustenance as our caregivers. From very early on, we learn that to feed another person is to love them. When I met Joe and discovered that I liked him, one of the very first things I did for him was to make sauteed balsamic-thyme sirloin tips with mozzarella cheese. And it was not a dish I made to be particularly impressive, but because I had those ingredients in the fridge. It won him over, and the feeling of providing that kind of comfort to another person won me over. True, I’d spent the latter half of my freshman year of college cooking weekly meals with a friend for our group of friends, but that was the first time it was me alone just whipping something up on the fly for someone else. In any case, I kept cooking. I read culinary textbooks, southern cookbooks, cookbooks for every ethnic food imaginable…anything to stimulate my imagination to create new things. But at the same time, I found it difficult to avoid overeating when I was always trying out new recipes. I walk the line. I am constantly trying to balance between being passionate about the creation and sharing of food while avoiding gluttony and irresponsibly grown/created food products. It becomes overwhelming, it becomes burdensome, and worst of all…cooking becomes guilt-ridden.

And then I know it’s time to step back, take a breath, and just go home again. Time to take a day and remember why the act of sharing a meal is an act of love. Remove everything else from the equation and just create out of the desire to love another person.

And on Sunday, I did just that. Taking flour from Morris farms, eggs from Polyface farms, cheese from Blue Ridge Dairy Co., tomatoes, garlic, and basil from Bull Run Mountain Farm, and cayenne peppers from my own backyard, I brought together those who provide me with products I know are grown and raised with love and a sense of pride.

First, I made these:
I made the pasta dough from a combination of whole wheat and whole grain durum (semolina) flours, two eggs, a few tablespoons of olive oil, and a few tablespoons of water. It made a fine, elastic dough that was surprisingly light. I think that one of the keys to whole wheat pasta is to make sure that the dough gets a proper rest before it’s rolled out. The filling is comprised of part-skim ricotta, parmesan, and pecorino romano cheeses. I bound it with an egg and added a few herbs and spices to bring out the flavors of the individual cheeses.


What good are ravioli without a nice sauce? Since Leigh said that it was likely the last week for big, ripe tomatoes (damn blight) I took the bunch of gorgeous orange and yellow ones he gave me and sauteed them in a few teaspoons of bacon fat with garlic, some bell pepper, thyme, basil, and spices. I finished it with a diced cayenne pepper. I’m not really a huge spicy food fan, so I removed the seeds first. After tasting the sauce, I instantly mourned that it would be gone so quickly. Even Joe, who normally asks me to go light on the marinara sauce when I serve him pasta, asked for more of it on his plate.

And what better to serve a lovingly prepared meal on than a dish designed with the earth in mind?[FYI, that’s a seven-inch triangle plate in grass green from Riverside Design Group’s Sea Glass collection. How awesome is that color? If I didn’t already have an “Empire Red” theme going on with my kitchen appliances, I think I’d go with that green. It’s refreshing!]

After it was all said and done, I felt accomplished. Even satisfied.

But it wasn’t until Joe brought me his empty plate in search of a few more ravioli that I felt “the happiness.” There was that same look that made me feel all warm and fuzzy five years ago, and I thought “Yes. I may not always do right. I may not always make the best choices. But if I can always give this kind of comfort and love to the people around me, then I think I’ll be okay.”

-Neen